Setting Up Neovim LSP with Ruby and Rails
I recently saw a video touting Zed (don’t you dare) as the new hotness IDE. The creator was someone who I respect a ton, but I was quite taken aback by some of the features they were demonstrating as though they were a big reveal. It went something like: “Ta-da! You can use vertical panes!” or “Ta-da! A fuzzy finder searches through your project!”.
Looking through the comments, I noticed a lot of positive engagement that made me wonder how something that I thought was relatively “solved” in Neovim could evoke such reverence and awe with a newer IDE. I’m certainly not here to shame any other editors or IDE, but I always want to be a good steward of Vim and Neovim. And that means spreading the good word!
Your Editor as a Core Competency
Hearkening back to my recent blog post about davetron’s docker+bash book, I am a big proponent of configuring your editor or IDE just for yourself - even if that means you’re missing a little functionality in the short-term.
For something as vital as your dev environment—the thing that allows you to even do work—the answer is that you do not want to debug or maintain something you cannot control. Your dev environment should be a core com- petency, at least your team’s core competency, if not every single members’.
-David Bryant Copeland
So if you’ve tried to get off the ground with Neovim in the past but couldn’t quite get enough momentum, or if DHH’s switch after 20 years inspired you to give it a shot, sally forth. I’m going to show you how to set up some of the most basic but most helpful plugins and features to improve your workflow.
All That Being Said…
I guess most folks aren’t that interested in improving their Vim config on a Friday night, so I have to mention that there are some excellent Neovim distributions like AstroNvim or LunarVim that will give you much more functionality than what I’ll cover today, but it comes with the whole kitchen sink.
What we’ll set up
- Lazy Plugin Manager
- Telescope
- An LSP of Choice
- Auto Completion
What we get
- Vim config ripe for extensibility
- Fuzzy finding of all kinds
- Instant sytnax and linting feedback (including goto definition)
- Many keystrokes saved
- An editor we understand that doesn’t require a login
# Note:
# This tutorial skips the use of mason-lspconfig because
# I don't mind having specific calls to each of the LSPs in my
# config
Let’s get started -
lazy.nvim
lazy.nvim is a fantastic plugin manager for Neovim. You don’t really need to know any specficis about how it works, just know that it’s great.
Starting from scratch, you should create a file in ~/.config/nvim/ called init.lua.
This is the entry point for your nvim config, and it’s where we’ll immediately get help from lazy.
-- ~/.config/nvim/init.lua

local lazypath = vim.fn.stdpath("data") .. "/lazy/lazy.nvim"
if not (vim.uv or vim.loop).fs_stat(lazypath) then
  local lazyrepo = "https://github.com/folke/lazy.nvim.git"
  vim.fn.system({ "git", "clone", "--filter=blob:none", "--branch=stable", lazyrepo, lazypath })
end
vim.opt.rtp:prepend(lazypath)

vim.g.mapleader = " "
vim.g.maplocalleader = "\\"

require("lazy").setup({
  spec = {
	  -- PLUGINS GO HERE
  },
  install = { colorscheme = { "habamax" } },
  checker = { enabled = true },
})
Restart Neovim and run :checkhealth lazy
Check Steps
- Create a .config/nvim/init.lua file
- Add lazy config
:checkhealth lazy
telescope.nvim
telescope.nvim is a highly-customizable fuzzy finder. It allows you to search for files, buffers, symbols, errors, and just about anything else you can imagine. My favorite pattern for using Telescope is searching for a specific controller or model in a project, I can type just enough characters without needing to type the exact filename.
For example: when fuzzy-finding files in my project, if I’m looking for the admin users controller, I can type conadus because of the fuzzy matching on the filename.
app/<con>trollers/<ad>min/<us>ers_controller.rb
I’ll leave it as an exercise for the reader to get the following dependencies installed:
- A font with ligature and icon support, preferrably from NerdFonts - Suggested
- ripgrep - Suggested
- fd - Optional
And let’s add the first few plugins to our lazy config, consisting of telescope and the rest of our dependencies -
-- ~/.config/nvim/init.lua

local lazypath = vim.fn.stdpath("data") .. "/lazy/lazy.nvim"
if not (vim.uv or vim.loop).fs_stat(lazypath) then
  local lazyrepo = "https://github.com/folke/lazy.nvim.git"
  vim.fn.system({ "git", "clone", "--filter=blob:none", "--branch=stable", lazyrepo, lazypath })
end
vim.opt.rtp:prepend(lazypath)

vim.g.mapleader = " "
vim.g.maplocalleader = "\\"

require("lazy").setup({
  spec = {
	  'nvim-lua/plenary.nvim',          -- New
	  'nvim-tree/nvim-web-devicons',    -- New
	  'nvim-telescope/telescope.nvim',  -- New
  },
  install = { colorscheme = { "habamax" } },
  checker = { enabled = true },
})
After restarting Neovim and while in normal mode, try typing :checkhealth telescope to make sure everything is accounted for.
To test it in action, while in Neovim, try typing :Telescope find_files.
You will probably want to set up some keymaps to make an easy shortcut for all the finders you have available now.
Telescope Usage
Check Steps
- Install a NerdFont
- Install ripgrep
- Install fd
- Add telescope plugins in init.lua
:checkhealth telescope
LSP
An LSP will essentially run a server in a separate process that is constantly parsing your code and offering syntax and linting improvements. They can be especially tricky in the world of Ruby because of the ruby and gem versions. But it’s still relatively simple to get running. I suggest using rbenv as your version manager, but the most critical part of getting the LSP to work is knowing how to run the executable for the LSP of your choice.
Let’s start by adding our plugins including Mason, an incredibly helpful LSP manager, as well as a reference to an LSP config file we will create.
Note the syntax on the Mason plugin line. It runs
.setup()for default configuration on the plugin.
-- ~/.config/nvim/init.lua

local lazypath = vim.fn.stdpath("data") .. "/lazy/lazy.nvim"
if not (vim.uv or vim.loop).fs_stat(lazypath) then
  local lazyrepo = "https://github.com/folke/lazy.nvim.git"
  vim.fn.system({ "git", "clone", "--filter=blob:none", "--branch=stable", lazyrepo, lazypath })
end
vim.opt.rtp:prepend(lazypath)

vim.g.mapleader = " "
vim.g.maplocalleader = "\\"

require("lazy").setup({
  spec = {
	  'nvim-lua/plenary.nvim',
	  'nvim-tree/nvim-web-devicons',
	  'nvim-telescope/telescope.nvim',
	  {'williamboman/mason.nvim', opts = {}}, -- New
	  'neovim/nvim-lspconfig',                -- New
  },
  install = { colorscheme = { "habamax" } },
  checker = { enabled = true },
})

require('lsp')                                -- New
The LSP client in Neovim is built-in, and doesn’t require a plugin, but the nvim-lspconfig plugin gives us some standard configurations that will make it easy to wire everything up for us. Let’s set up our lsp file. Note that it’s under a new directory-
-- ~/.config/nvim/lua/lsp.lua

local nvim_lsp = require('lspconfig')
local cmp = require('cmp_nvim_lsp')
local capabilities = vim.lsp.protocol.make_client_capabilities()
capabilities.textDocument.completion.completionItem.snippetSupport = true

-- Diagnostics symbols for display in the sign column.
-- You can change these to fancy glyphs
local signs = { Error = "x", Warn = "!", Hint = "?", Info = "i" }
for type, icon in pairs(signs) do
  local hl = "DiagnosticSign" .. type
  vim.fn.sign_define(hl, { text = icon, texthl = hl, numhl = hl })
end
vim.cmd('setlocal omnifunc=v:lua.vim.lsp.omnifunc')

-- If they're not working, try running `gem install solargraph` and `gem install ruby-lsp`
-- ruby-lsp requires ruby version 2.7.3 or higher and nvim 0.10.0
nvim_lsp.ruby_lsp.setup{
  cmd = { "/Users/$YOURUSERNAME/.rbenv/shims/ruby-lsp"},
  capabilities = cmp.default_capabilities(capabilities)
}
nvim_lsp.solargraph.setup{
  cmd = { "/Users/$YOURUSERNAME/.rbenv/shims/solargraph", "stdio"},
  capabilities = cmp.default_capabilities(capabilities)
}
nvim_lsp.standardrb.setup{
  cmd = { "/Users/$YOURUSERNAME/.rbenv/shims/standardrb", "--lsp"},
  capabilities = cmp.default_capabilities(capabilities)
}
Again this assumes that you are using a Mac and rbenv, but the cmd function should reflect where you can run the executable for the LSP, keeping in mind your ruby version manager and shims. You will need to install the gems for these LSP’s and they will be shimmed to a specific version
gem install solargraph # Installs solargraph based on ruby -v
And if using solargraph, you can use solargraph config to init a config file, or use solargraph global config
Restart Neovim, and you will likely see errors about these LSP’s being installed. From normal mode type :Mason and install whichever LSP you prefer to use. Another Neovim restart should now give you inline feedback.
Don’t forget, you can use :checkhealth mason
Check Steps
- Add plugins and new file reference in init.lua
- Add lsp.lua file and contents, configure
cmd =according to executable - Install LSP gem(s) of choice, make sure you can use their executable
- Install LSP via
:Mason :checkhealth mason- Run
:LspInfoto see if you’re attached to your LSP!
Auto Completion
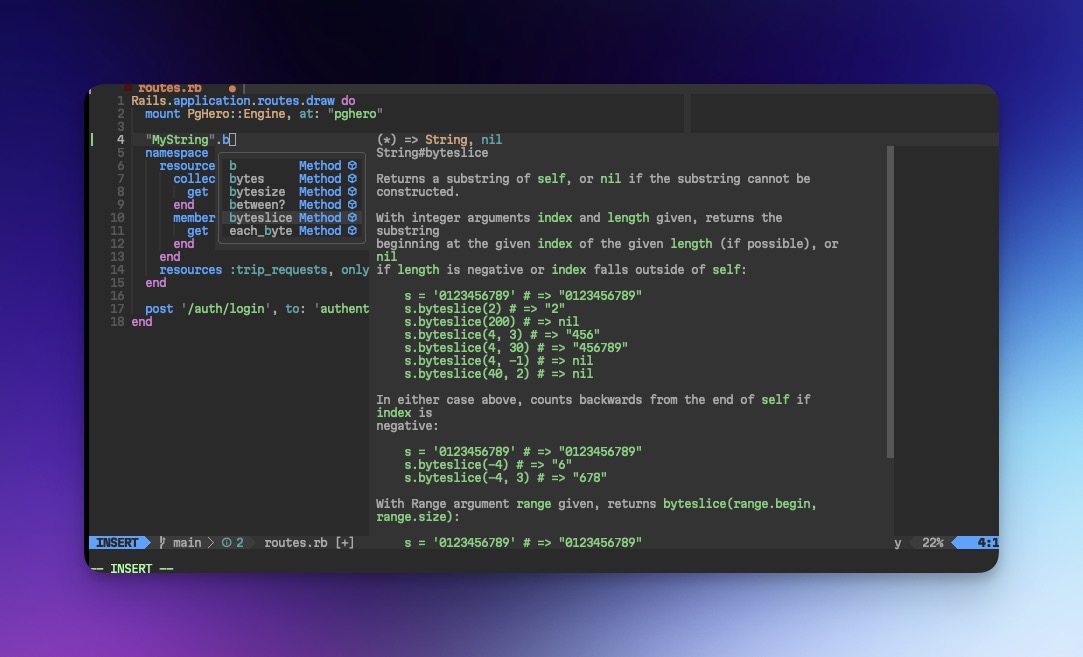
Connecting your new LSP functionality to the auto-completion functionality is the last step for our simple setup. Getting feedback while you type gives you a major boost in confidence.
Let’s add just a bit more to our init.lua, including another new file:
-- /.config/nvim/init.lua

local lazypath = vim.fn.stdpath("data") .. "/lazy/lazy.nvim"
if not (vim.uv or vim.loop).fs_stat(lazypath) then
  local lazyrepo = "https://github.com/folke/lazy.nvim.git"
  vim.fn.system({ "git", "clone", "--filter=blob:none", "--branch=stable", lazyrepo, lazypath })
end
vim.opt.rtp:prepend(lazypath)

vim.g.mapleader = " "
vim.g.maplocalleader = "\\"

require("lazy").setup({
  spec = {
	  'nvim-lua/plenary.nvim',
	  'nvim-tree/nvim-web-devicons',
	  'nvim-telescope/telescope.nvim',
	  {'williamboman/mason.nvim', opts = {}},
	  'neovim/nvim-lspconfig',
	  'hrsh7th/cmp-nvim-lsp',           -- New
	  'hrsh7th/nvim-cmp',               -- New
  },
  install = { colorscheme = { "habamax" } },
  checker = { enabled = true },
})

require('lsp')
require('nvim-cmp')                     -- New
And to fill out the new file:
-- ~/.config/nvim/lua/nvim-cmp.lua

local cmp = require'cmp'

cmp.setup({
    window = {
      completion = cmp.config.window.bordered(),
    },
    mapping = cmp.mapping.preset.insert({
      ['<C-b>'] = cmp.mapping.scroll_docs(-4),
      ['<C-f>'] = cmp.mapping.scroll_docs(4),
      ['<C-Space>'] = cmp.mapping.complete(),
      ['<C-e>'] = cmp.mapping.abort(),
      ['<CR>'] = cmp.mapping.confirm({ select = true }),
    }),
    sources = cmp.config.sources({
      { name = 'nvim_lsp' },
    }, {
      { name = 'buffer' },
    })
  })
Restart Neovim, open a Ruby file, and you should be up and running! I would highly encourage adding all the LSP/CMP plugins that add more sources and completion help.
Check Steps
- Add plugins and new file reference in init.lua
- Add nvim-cmp.lua file and contents
Now it’s between you and the motions
Hint: vimtutor
Hopefully this has been helpful for a simple custom setup. You should be able to match the patterns we used here to extend your config in all kinds of ways. Try new plugins and don’t worry if you break something. Always version control your config, and you can even checkout my dotfiles for some other ideas.
If you’d like something that’s somewhere in between a custom config, and a curated distro, this video by TJ DeVries is probably actually the only video you need to get started with Neovim. Cheers!